CeSail
CeSail
🚀 The AI-native web automation engine – parse, understand, and act on any website with agent-friendly data.
🌟 Why CeSail?
Traditional automation tools like Playwright and Selenium are great at clicking buttons — but terrible at helping AI agents understand the meaning of web pages.
CeSail changes that:
- It parses complex DOMs into clean, structured, JSON-like data.
- It maps semantics (e.g., “this is a login button”, “this is a price field”).
- It executes actions (click, type, scroll, navigate) with full end-to-end automation.
- It provides visual feedback with overlays for debugging and demos.
Think of it as the missing bridge between the messy web and intelligent AI workflows.
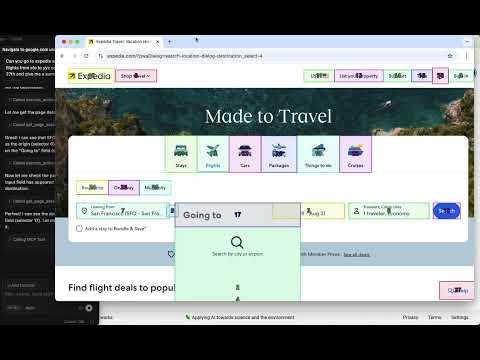
🎥 Demo
Here’s CeSail + Cursor MCP in action, searching flights on Expedia:
🔑 Features
- 🌐 Web Page Analysis – Extracts DOM elements, forms, buttons, and interactive components
- 🧠 Agent-Friendly Parsing – Converts raw HTML into structured, semantic data
- 🎯 Actionable Intelligence – Identifies clickable items, input fields, and navigation paths
- 📊 Structured Output – JSON-like objects that AI can instantly consume
- 🔍 Context Preservation – Maintains relationships between elements and their purposes
- 📸 Visual Overlays – Screenshots with highlighted action items
Quick Start
Install from PyPI (Recommended)
The easiest way to get started with CeSail is to install it from PyPI:
# Install CeSail
pip install cesail

# Install Playwright browsers
playwright install
Simple Example
Here’s a quick example that demonstrates CeSail’s core functionality:
import asyncio
from cesail import DOMParser, Action, ActionType

async def quick_demo():
    """Quick demonstration of CeSail's web automation capabilities."""
    async with DOMParser(headless=False) as parser:
        # Navigate to a website
        action = Action(
            type=ActionType.NAVIGATE,
            metadata={"url": "https://www.example.com"}
        )
        await parser._action_executor.execute_action(action)

        # Analyze the page and get structured data
        parsed_page = await parser.analyze_page()
        print(f"Found {len(parsed_page.important_elements.elements)} interactive elements")

        # Take a screenshot with overlays
        await parser.take_screenshot("demo_screenshot.png")

        # Show available actions
        print("Available actions:")
        for element in parsed_page.important_elements.elements[:3]:
            print(f"  - {element.type}: {element.text}")

# Run the demo
asyncio.run(quick_demo())
MCP (Model Context Protocol) Integration
CeSail provides a FastMCP server that enables AI assistants like Cursor to directly interact with web pages through standardized APIs. This allows you to give natural language commands to your AI assistant and have it execute web automation tasks.
Setting up MCP with Cursor
- Install CeSail MCP Server:
pip install cesail fastmcp playwright install - Configure MCP Settings:
- Open Cursor
- Go to Settings → Extensions → MCP
- Add a new server configuration:
- Note: Make sure to use the path to your Python executable. You can find it by running
which pythonorwhich python3in your terminal.{ "mcpServers": { "cesail": { "command": "python3", "args": ["-m", "cesail.cesail_mcp.fastmcp_server"], "env": { "PYTHONUNBUFFERED": "1" }, "description": "CeSail MCP Server for comprehensive web automation and DOM parsing", "capabilities": { "tools": { "listChanged": true } } } } }
Note: This configuration has been tested with Cursor. For best performance, users should disable the
get_screenshotcapability as Cursor screenshots can take a while to process. To disable it, go to Cursor Settings → Tools & Integrations → MCP and disable theget_screenshotcapability for the CeSail server. This should also work with other MCP-compatible agents, though it hasn’t been tested with them.For more help setting up Cursor MCP, see: https://docs.cursor.com/en/context/mcp
- Test the FastMCP Server:
python3 -m cesail.cesail_mcp.fastmcp_serverRun this command to ensure the server launches properly. You should see output indicating the server is starting up.
- Use in Cursor:
Now you can ask Cursor to perform web automation tasks:
"Using cesail, Navigate to example.com and do a certain task"
"Using cesail, ..."
Why Agents Need This
Traditional web scraping provides raw HTML, which is difficult for AI agents to interpret. CeSail solves this by:
- Semantic Understanding: Identifies what each element does (button, form, link, etc.)
- Action Mapping: Maps elements to executable actions (click, type, navigate)
- Context Enrichment: Adds metadata about element purpose and relationships
- Structured Data: Outputs clean, predictable data structures
- Visual Context: Combines DOM analysis with visual information via screenshots and overlays highlighting actionable elements
- Highly Configurable: Customizable settings for different use cases and requirements
This transformation makes it possible for AI agents to:
- Understand page structure at a glance
- Identify actionable elements quickly
- Execute precise interactions
- Adapt to different page layouts
- Make intelligent decisions about next actions
Architecture
┌─────────────────┐    ┌─────────────────┐    ┌─────────────────┐
│     Cursor      │    │   MCP Server    │    │  DOM Parser     │
│   (AI Agent)    │◄──►│   (Python)      │◄──►│  (Python)       │
│                 │    │                 │    │                 │
│ • Natural Lang. │    │ • FastMCP APIs  │    │ • Page Analyzer │
│ • Task Planning │    │ • Web Automation│    │ • Action Exec.  │
│ • Execution     │    │ • Screenshots   │    │ • Idle Watcher  │
└─────────────────┘    └─────────────────┘    └─────────────────┘
                                                        │
                                                        │
                                        ┌─────────────────┐
                                        │   Web Browser   │
                                        │  (Playwright)   │
                                        │                 │
                                        │ • Page Control  │
                                        │ • DOM Access    │
                                        │ • Screenshots   │
                                        │ • Actions       │
                                        └─────────────────┘
                                                        │
                                                        │
                                        ┌─────────────────┐
                                        │  JavaScript     │
                                        │  Layer          │
                                        │                 │
                                        │ • Element Ext.  │
                                        │ • Selector Gen. │
                                        │ • Text Analysis │
                                        │ • Action Ext.   │
                                        └─────────────────┘
Key Architecture Points:
- MCP Server: Connects to DOM Parser for web automation APIs
- DOM Parser: Orchestrates page analysis, action execution, and idle watching
- Web Browser: Connected to DOM Parser for page control and actions
- JavaScript Layer: Injected into web browser for DOM parsing and element extraction
- Actions: Executed by Playwright, parsing done manually through JavaScript
Components
1. DOM Parser JavaScript Layer (cesail/dom_parser/src/js/)
Core DOM parsing engine that transforms raw HTML into structured, agent-friendly data.
Language: JavaScript
Features:
- Element Extraction: Identifies and categorizes interactive elements (buttons, forms, links)
- Semantic Analysis: Understands element purpose and context
- Action Mapping: Maps elements to executable actions (click, type, navigate)
- Text Scoring: Prioritizes important text content for agents
- Selector Generation: Creates reliable CSS selectors for element targeting
- Performance Optimization: Caching and monitoring for speed
- ARIA Support: Accessibility attribute analysis
- Visual Context: Combines DOM data with visual information
- Processing Pipeline: Multi-stage element processing and filtering
Key Components:
index.js: Main entry point and public APIaction-extraction.js: Extracts actionable elements and metadatafilter-elements.js: Filters and groups elements by importancescoring.js: Scores elements based on visibility and interactivityselector-extraction.js: Generates reliable CSS selectorsvisualizer.js: Visual debugging and element highlightingcache-manager.js: Performance optimization and caching
Data Transformation Example:
// Raw HTML input
<button class="btn-primary" onclick="submit()">Submit Form</button>
<input type="text" placeholder="Enter email" id="email" />

// CeSail transforms to agent-friendly JSON
{
  "type": "BUTTON",
  "selector": "button.btn-primary",
  "text": "Submit Form",
  "action": "CLICK",
  "importance": 0.9,
  "context": "form submission",
  "metadata": {
    "aria-label": null,
    "disabled": false,
    "visible": true
  }
}
Documentation: See cesail/dom_parser/src/js/README.md
2. DOM Parser Python Layer (cesail/dom_parser/src/py/)
Orchestration layer that manages browser interactions and provides high-level APIs.
Language: Python
Features:
- Page Analysis: Comprehensive page structure analysis and element extraction
- Action Execution: Executes clicks, typing, navigation, and other web actions
- Idle Watching: Monitors page state changes and waits for stability
- Screenshot Integration: Captures and analyzes visual page content
- Configuration Management: Flexible configuration for different use cases
- Session Management: Maintains browser state across interactions
- Error Handling: Robust error recovery and retry logic
Key Components:
dom_parser.py: Main interface for DOM parsing and interactionpage_analyzer.py: Analyzes page structure and extracts actionable elementsaction_executor.py: Executes web actions through Playwrightidle_watcher.py: Monitors page state and waits for stabilityscreenshot.py: Captures and processes page screenshotstypes.py: Data structures and type definitionsconfig.py: Configuration management and validationactions_plugins/: Modular action implementations (navigation, interaction, input, system)
Integration Example:
async with DOMParser() as parser:
    # Navigate to page
    await parser.navigate("https://example.com")

    # Analyze page structure
    parsed_page = await parser.analyze_page()

    # Execute actions
    await parser.click("button.btn-primary")
    await parser.type("input#email", "user@example.com")
Documentation: See cesail/dom_parser/src/py/README.md
2. MCP Server (cesail/cesail_mcp/)
FastMCP server that provides standardized APIs for agents to interact with transformed web data.
Language: Python
Features:
- Structured APIs: Clean, predictable endpoints for web automation
- Action Execution: Execute clicks, typing, navigation based on transformed data
- Page Analysis: Get structured page information in agent-friendly format
- Screenshot Integration: Visual context combined with structured data
- Session Management: Maintain state across interactions
- Error Handling: Robust retry logic and error recovery
Agent-Friendly API Example:
# Agent receives structured data from CeSail
parsed_page = await parser.analyze_page()

# Get the actions data (this is what agents typically work with)
actions = parsed_page.get_actions()

# Example actions data structure
actions_data = [
  {
    "type": "LINK",
    "selector": "2",
    "importantText": "Vintage vibesCreate your weekend moodboard | Vinta | /today/best/create-your-weekend-moodboard/128099/"
  },
  {
    "type": "LINK",
    "selector": "3",
    "importantText": "Summer hobbiesTry bead embroidery | Summer hobbies | /today/best/try-bead-embroidery/128240/"
  },
  {
    "type": "SELECT",
    "selector": "5",
    "importantText": "search-box-input | combobox | Search | Search"
  },
  {
    "type": "BUTTON",
    "selector": "8",
    "importantText": "vertical-nav-more-options-button | More options | More options"
  },
  {
    "type": "BUTTON",
    "selector": "10",
    "importantText": "Sign up"
  }
  ]


**Documentation**: See [cesail/dom_parser/src/py/README.md](/CeSail/cesail/dom_parser/src/py/) for more details about the parsed page data structure.
Usage: python3 -m cesail.cesail_mcp.fastmcp_server
3. Simple Agent (cesail/simple_agent/) - WIP
AI-powered web automation agent using LLM for task breakdown and execution.
Language: Python
Features:
- Natural language task processing
- Automated task breakdown and planning
- LLM-powered decision making
- Visual analysis with screenshots
- Interactive execution monitoring
Documentation: See cesail/simple_agent/README.md for more details.
Usage: python3 -m cesail.simple_agent.simple_agent
Testing
CeSail includes comprehensive test suites to validate functionality and demonstrate capabilities.
Test Categories
- Playground Tests - Integration tests with real websites (Google, Amazon, YouTube, Pinterest, etc.)
- Unit Tests - Individual component testing
- Replay Tests - Regression testing with golden values
Quick Start
# Activate virtual environment
source venv/bin/activate

# Set PYTHONPATH
export PYTHONPATH=/Users/rachitapradeep/CeSail:$PYTHONPATH

# Run playground tests (great way to see CeSail in action!)
pytest cesail/dom_parser/tests/playground/test_page_analyzer_integration_pinterest.py -v -s

# Run all tests
pytest cesail/dom_parser/tests/ -v
Playground Tests
The playground tests are an excellent way to see CeSail navigate through real websites:
- Google Search: Navigate and search functionality
- Amazon: Product browsing and search
- YouTube: Video navigation and interaction
- Pinterest: Image browsing and pinning
- Airbnb: Property search and filtering
- Google Flights: Flight search and booking flow
These tests demonstrate CeSail’s ability to:
- Extract interactive elements from complex websites
- Navigate through multi-step workflows
- Handle dynamic content and AJAX loading
- Generate screenshots with bounding boxes
- Process structured data for AI agents
Documentation: See cesail/dom_parser/tests/README.md for complete testing guide and examples.
Development Installation
For development or advanced usage:
Prerequisites:
- Python: 3.9 or higher
- Node.js: 14 or higher (for DOM Parser development)
- OpenAI API Key: Required for Simple Agent
- Git: For cloning the repository
Installation:
- Clone the repository:
git clone https://github.com/AkilaJay/cesail.git cd cesail - Set up Python environment:
python3 -m venv venv source venv/bin/activate # On Windows: venv\Scripts\activate pip install -e . - Set up DOM Parser (optional):
cd cesail/dom_parser npm install npm run build cd .. - Configure environment (for Simple Agent):
# Create .env file in cesail/simple_agent/ directory echo "OPENAI_API_KEY=your_openai_api_key_here" > cesail/simple_agent/.env - Playwright browsers are installed automatically during package installation.
If you encounter any issues, you can manually install them:
playwright install
Troubleshooting
Common Issues
1. Import Errors
Problem: ModuleNotFoundError: No module named 'dom_parser'
Solution: Ensure you’re in the correct directory and virtual environment is activated
2. Playwright Browser Issues
Problem: Browser not found or crashes Solution: Reinstall Playwright browsers:
playwright install
3. OpenAI API Errors
Problem: API key invalid or rate limited Solution: Check your API key and usage limits in the OpenAI dashboard
4. Screenshot Failures
Problem: Screenshots fail with “Target page closed” error Solution: Add proper error handling and retry logic
API Reference
For detailed API documentation, see the component-specific README files:
DOM Parser APIs
- Python Layer: cesail/dom_parser/src/py/README.md - Complete Python API reference including DOMParser, PageAnalyzer, ActionExecutor, and more
- JavaScript Layer: cesail/dom_parser/src/js/README.md - JavaScript DOM parsing APIs and element extraction functions
MCP Server API
- FastMCP Integration: See the MCP server documentation for standardized web automation APIs
- Documentation: See cesail_mcp/README.md for complete API reference and usage examples
Simple Agent API (WIP)
- Natural Language Processing: Process user input and execute web automation tasks
- LLM Integration: AI-powered task breakdown and execution
- Documentation: See cesail/simple_agent/README.md for current API details
Contributing
We welcome contributions! Here’s how to get started:
Development Setup
- Fork the repository
- Create a feature branch:
git checkout -b feature/your-feature-name - Make your changes
- Add tests for new functionality
- Run tests to ensure everything works
- Submit a pull request
Code Style
- Python: Follow PEP 8, use Black for formatting
- JavaScript: Follow ESLint rules, use Prettier for formatting
- Documentation: Update README files for new features
Testing
- Write unit tests for new functions
- Add integration tests for new features
- Ensure all existing tests pass
Project Structure
cesail/
├── cesail/                  # Python package
│   ├── dom_parser/          # JavaScript DOM parser
│   ├── src/                # Source code
│   ├── dist/               # Built files
│   ├── tests/              # JavaScript tests
│   └── README.md           # Component documentation
│   ├── cesail_mcp/         # FastMCP server
│   ├── fastmcp_server.py   # Main server file
│   ├── server.py           # Alternative server
│   └── tests/              # MCP tests
│   ├── simple_agent/       # AI web automation agent
│   ├── simple_agent.py     # Main agent file
│   ├── llm_interface.py    # LLM integration
│   └── .env               # Environment variables
├── venv/                   # Python virtual environment
├── setup.py               # Python package configuration
├── pyproject.toml         # Project configuration
└── README.md              # This file
Support
- Issues: Report bugs and feature requests on GitHub
- Discussions: Join discussions for questions and ideas
- Documentation: Check component-specific README files for detailed docs
Roadmap
- Enhanced simple agent
- Plugin framework for actions
- More native actions / Parser enhancements
- Replay framework
Help needed / Bugs
- Idle watcher doesn’t always wait for the page to load. Need to fix.
- Simple agent enhancements
- Parser enhancements
- Testing
Contact
For questions, issues, or contributions:
- Email: ajjayawardane@gmail.com
- GitHub: @AkilaJay
- Issues: GitHub Issues
License
This project is licensed under the MIT License - see the LICENSE file for details.